GitHub Pages
Overview
GitHub Pages is a website hosting service that enables you to publish content based on source code managed within a GitHub repository.
There are three ways to publish Quarto websites and documents to GitHub Pages:
Render sites on your local machine to the
docsdirectory, check the rendered site into GitHub, and then configure your GitHub repo to publish from thedocsdirectory.Use the
quarto publishcommand to publish content rendered on your local machine.Use a GitHub Action to automatically render your files (a single Quarto document or a Quarto project) and publish the resulting content whenever you push a source code change to your repository.
We’ll cover each of these methods below, but first an important pre-requisite: you need to have a Git repository on your local machine that is synced to GitHub. The URL of the published website will be derived from the combination of your username and the repository name (e.g. https://username.github.io/reponame/).
You can optionally configure a custom domain for a GitHub Pages site, but before exploring that, get your site up and running with the default domain.
Render to docs
The simplest way to publish using GitHub Pages is to render to the docs directory and then check that directory into your repository. If you prefer not to check rendered output into version control see the discussion of using Publish Command below.
To get started, change your project configuration to use docs as the output-dir. For example:
_quarto.yml
project:
  type: website
  output-dir: docs
Then, add a .nojekyll file to the root of your repository that tells GitHub Pages not to do additional processing of your published site using Jekyll (the GitHub default site generation tool):
| Mac/Linux | Terminal |
| Windows | Terminal |
Now, render your site and push it to GitHub:
Terminal
quarto render
git add docs
git commit -m "Publish site to docs/"
git push
Finally, configure your GitHub repository to publish from the docs directory of your main branch:

Once you’ve made this configuration change GitHub will trigger a deployment of your website. Your site will also be updated whenever you commit and push to main.
Publish Command
The quarto publish command is an easy way to publish locally rendered documents and websites. Before attempting to use quarto publish (either locally or from a GitHub Action) you should be sure to configure Ignore Output as described below. See Source Branch for an overview of how the gh-pages branch is managed.
Source Branch
quarto publish gh-pages automatically creates a gh-pages branch (locally and on the remote) on its first run if one does not already exist. For most repositories — the typical project site case where the URL is https://<username>.github.io/<repo>/ — GitHub then detects the new branch and configures GitHub Pages to deploy from it automatically. No manual configuration under Settings : Pages is required.
User and organization sites (served at https://<username>.github.io/) behave differently on the GitHub side: their default publishing source is the main branch, not gh-pages. After the first run of quarto publish gh-pages you therefore need to switch the source branch to gh-pages manually under Settings : Pages for your repository:
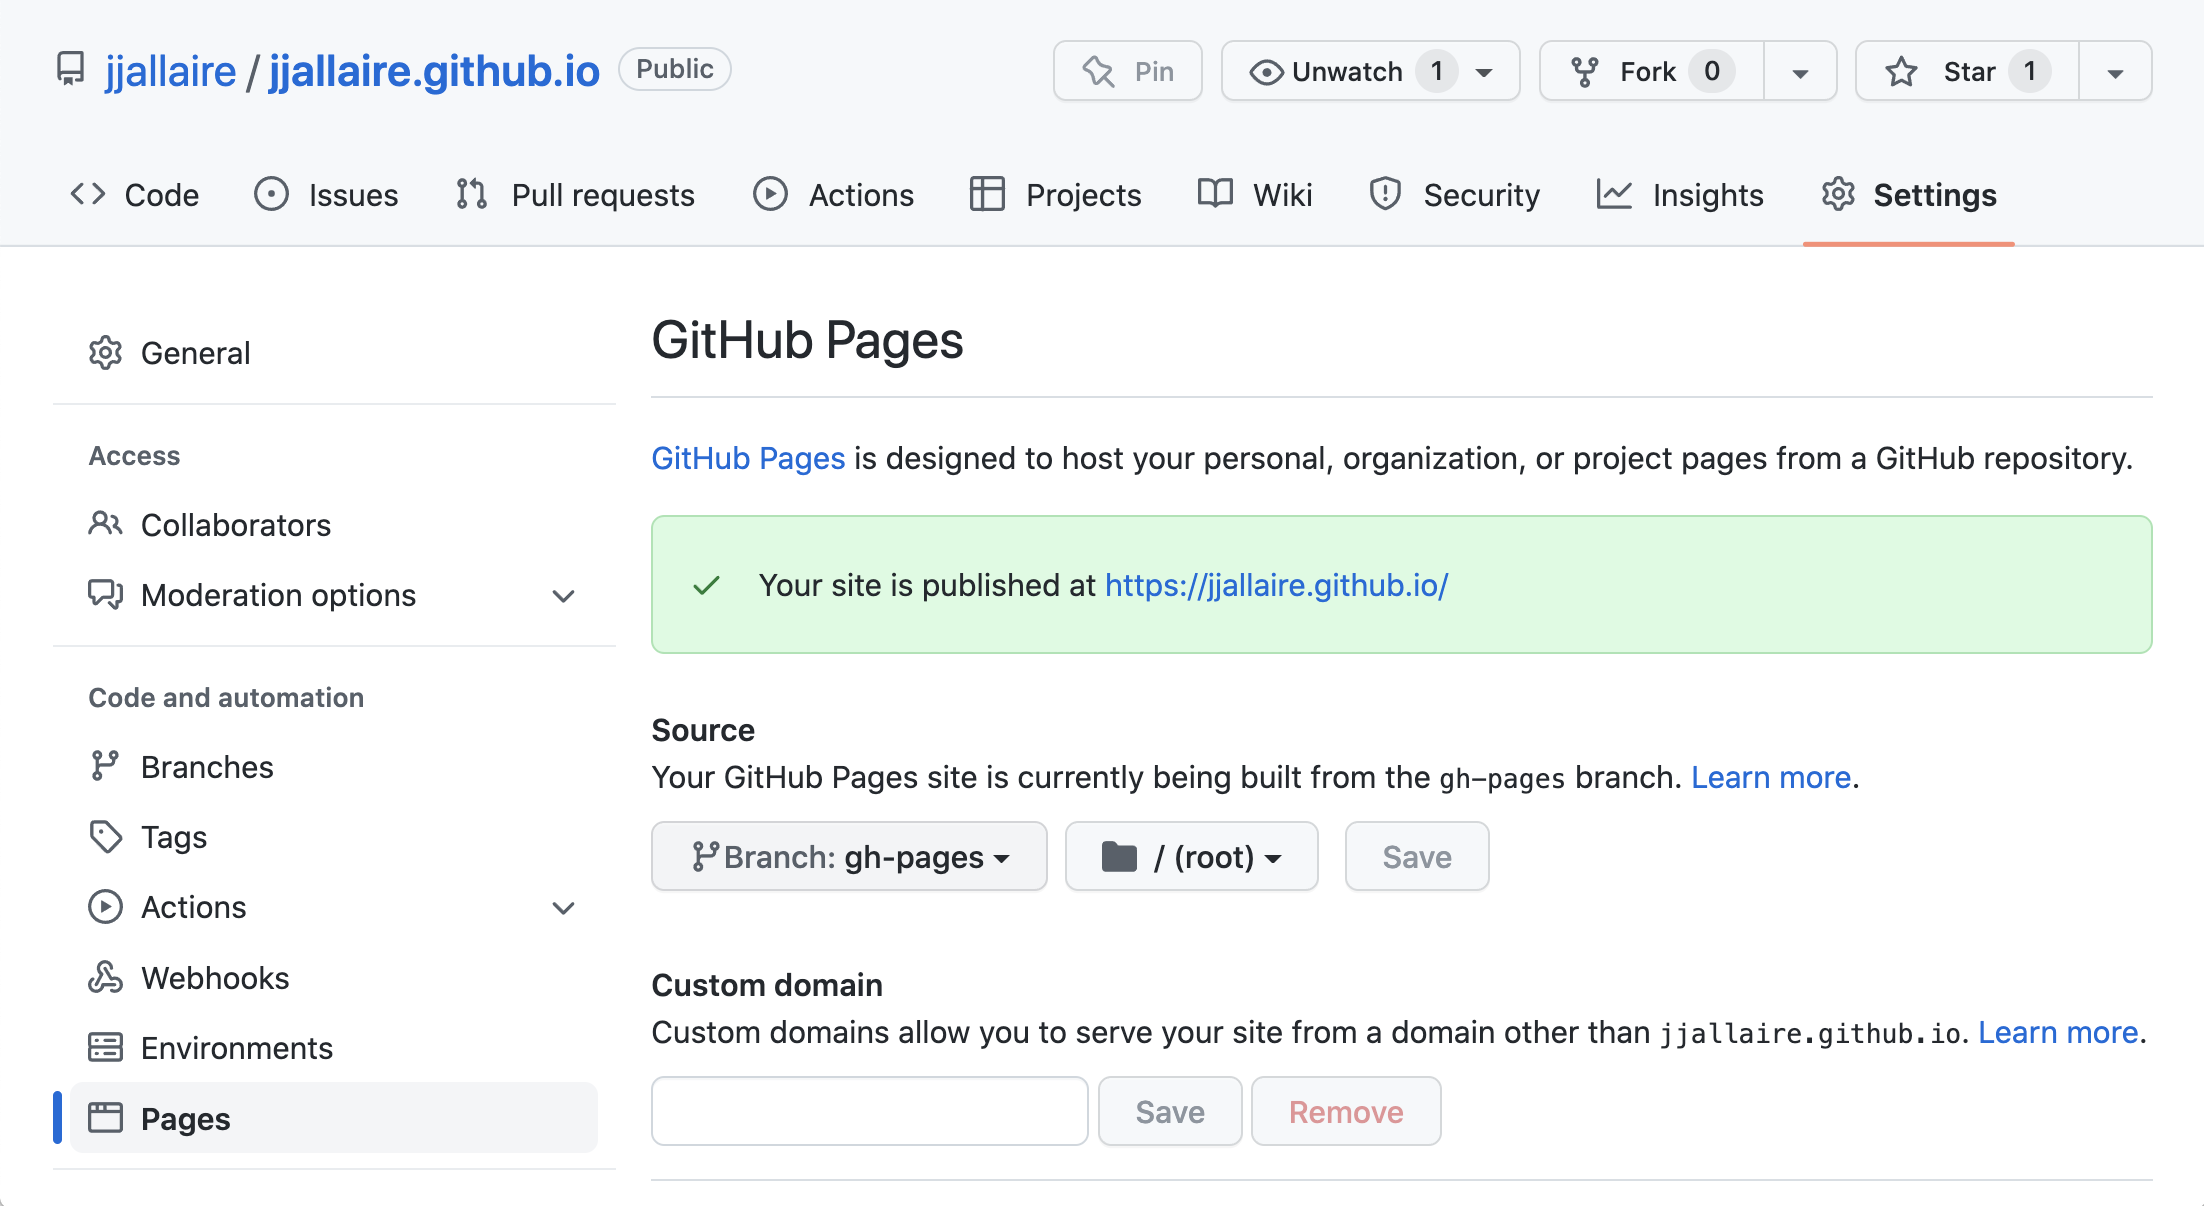
Quarto prints a notice with a direct link to this settings page when it detects this case. See the User Site section below for the complete setup.
gh-pages branch manually
You usually do not need to do this — quarto publish gh-pages will create the branch on its first run. If you prefer to set it up yourself beforehand, first make sure you have committed all changes on your current working branch with git status, then run:
Terminal
git checkout --orphan gh-pages
git reset --hard # make sure all changes are committed before running this!
git commit --allow-empty -m "Initialising gh-pages branch"
git push origin gh-pages
Get back to your original repository branch with, for example, git checkout main.
Ignoring Output
It’s important to note that you don’t need to check your _site or _book directory into version control (if you have done this in the past you know it makes for very messy diffs!). Before proceeding you should add the output directory of your project to .gitignore. For example:
.gitignore
/.quarto/
/_site/
If you’ve already checked these files into source control you may need to remove them explicitly:
Terminal
git rm -r _sitePublishing
Once you have updated your .gitignore, navigate to the directory where your project / git repository is located, make sure you are not on the gh-pages branch, and execute the quarto publish command for GitHub Pages:
Terminal
quarto publish gh-pagesThe publish command will confirm that you want to publish, render your content, copy the output to a special gh-pages branch, push that branch to GitHub, and then open a browser to view your site once it is deployed.
Private Sites
If you are publishing to a private (i.e. password protected) website then the logic within quarto publishthat waits for your site to be available before opening a browser won’t work correctly. In this case you should pass the --no-browser option to bypass this:
Terminal
quarto publish gh-pages --no-browserDocuments
To publish a document rather than a website or book, provide the path to the document (note that you can publish only one document from a given GitHub repository):
Terminal
quarto publish gh-pages document.qmdOptions
Here are all of the available command line options for quarto publish gh-pages:
| Option | Behavior |
|---|---|
--no-prompt |
Do not prompt to confirm publish actions. |
--no-browser |
Do not open a browser after publish. |
--no-render |
Do not re-render prior to publish |
GitHub Action
Using the quarto publish gh-pages command to publish locally rendered content is the most simple and straightforward way to publish. Another option is to use GitHub Actions to render and publish your site (you might prefer this if you want execution and/or rendering to be automatically triggered from commits).
There are a few different ways to approach rendering and publishing content. Below, we’ll provide a how-to guide for publishing with GitHub Actions. For more conceptual background on the various approaches, see the discussion on Rendering for CI.
Freezing Computations
To make sure that R, Python, and Julia code is only executed locally, configure your project to use Quarto’s freeze feature by adding this to your _quarto.yml:
_quarto.yml
execute:
  freeze: auto
Now, fully re-render your site:
Terminal
quarto renderIf you have executable code in your project you’ll notice that a _freeze directory has been created at the top level of your project. This directory stores the results of computations and should be checked in to version control. Whenever you change a .qmd file with executable code, it will automatically be re-run during your next render and the updated computations will be stored in _freeze.
Note that an alternative approach is to execute the code as part of the GitHub Action. For now we’ll keep things simpler by executing code locally and storing the computations by using freeze. Then, further below, we’ll cover Executing Code within a GitHub Action.
Publish Action
Before configuring the publishing action, it’s important that you run quarto publish gh-pages locally, once. This will create the _publish.yml configuration required by the subsequent invocations of the GitHub Action. To do this, run the following from within your project:
quarto publish gh-pagesOnce you’ve completed a local publish, add a publish.yml GitHub Action to your project by creating this YAML file and saving it to .github/workflows/publish.yml:
.github/workflows/publish.yml
on:
  workflow_dispatch:
  push:
    branches: main

name: Quarto Publish

jobs:
  build-deploy:
    runs-on: ubuntu-latest
    permissions:
      contents: write
    steps:
      - name: Check out repository
        uses: actions/checkout@v4

      - name: Set up Quarto
        uses: quarto-dev/quarto-actions/setup@v2

      - name: Render and Publish
        uses: quarto-dev/quarto-actions/publish@v2
        with:
          target: gh-pages
        env:
          GITHUB_TOKEN: ${{ secrets.GITHUB_TOKEN }}
This action will run whenever you push to the main branch of your repository. It will also run when you manually trigger the action from the Actions tab of your repository. The action will render your content and publish it to GitHub Pages, thus you need to ensure that GitHub Actions has permission to write to your repository. This is done by checking the Read and write permissions box under Workflow permissions in the Actions section of your repository Settings.
Once you’ve done this, check all of the newly created files (including the _freeze directory) into your repository and then push to GitHub. A GitHub Pages site will be created for your repository, and every time you push a new change to the repository it will be automatically rebuilt to reflect the change. Consult the Pages section of your repository Settings to see what the URL and publish status for your site is.
Executing Code
If you prefer, you can also configure a GitHub Action to execute R, Python, or Julia code as part of rendering. While this might reflexively seem like the best approach, consider the following requirements imposed when you execute code within a CI service like GitHub Actions:
You need to reconstitute all of the dependencies (R, Python, or Julia plus the correct versions of required packages) in the CI environment.
If your code requires any special permissions (e.g. database or network access) those permissions also need to be present on the CI server.
Your project may contain documents that can no longer be easily executed (e.g. blog posts from several years ago that use older versions of packages). These documents may need to have
freezeindividually enabled for them to prevent execution on CI.
Prerequisites
The best way to ensure that your code can be executed within a GitHub Action is to use a virtual environment like venv or renv with your project (below we’ll provide example actions for each). If you aren’t familiar with using these tools check out the article on using Virtual Environments with Quarto to learn more.
Once you’ve decided to execute code within your GitHub Action you can remove the freeze: auto described above from your _quarto.yml configuration. Note that if you want to use freeze selectively for some documents or directories that is still possible (for a directory, create a _metadata.yml file in the directory and specify your freeze configuration there—this is what Quarto does by default for the posts folder of blog projects).
Example: Jupyter with venv
Here is a complete example of a GitHub Action that installs Python, Jupyter, and package dependencies from requirements.txt, then executes code and renders output to GitHub Pages:
.github/workflows/publish.yml
on:
  workflow_dispatch:
  push:
    branches: main

name: Quarto Publish

jobs:
  build-deploy:
    runs-on: ubuntu-latest
    permissions:
      contents: write
    steps:
      - name: Check out repository
        uses: actions/checkout@v4

      - name: Set up Quarto
        uses: quarto-dev/quarto-actions/setup@v2

      - name: Install Python and Dependencies
        uses: actions/setup-python@v5
        with:
          python-version: '3.10'
          cache: 'pip'
      - run: pip install jupyter
      - run: pip install -r requirements.txt

      - name: Render and Publish
        uses: quarto-dev/quarto-actions/publish@v2
        with:
          target: gh-pages
        env:
          GITHUB_TOKEN: ${{ secrets.GITHUB_TOKEN }}
Example: Knitr with renv
Here is a complete example of a GitHub Action that installs R and package dependencies from renv.lock, then executes code and renders output to GitHub Pages:
.github/workflows/publish.yml
on:
  workflow_dispatch:
  push:
    branches: main

name: Quarto Publish

jobs:
  build-deploy:
    runs-on: ubuntu-latest
    permissions:
      contents: write
    steps:
      - name: Check out repository
        uses: actions/checkout@v4

      - name: Set up Quarto
        uses: quarto-dev/quarto-actions/setup@v2

      - name: Install R
        uses: r-lib/actions/setup-r@v2
        with:
          r-version: '4.2.0'

      - name: Install R Dependencies
        uses: r-lib/actions/setup-renv@v2
        with:
          cache-version: 1

      - name: Render and Publish
        uses: quarto-dev/quarto-actions/publish@v2
        with:
          target: gh-pages
        env:
          GITHUB_TOKEN: ${{ secrets.GITHUB_TOKEN }}
Additional Options
It’s possible to have a Quarto project in a larger GitHub repository, where the Quarto project does not reside at the top-level directory. In this case, add a path input to the invocation of the publish action. For example:
- name: Render and Publish
  uses: quarto-dev/quarto-actions/publish@v2
  with:
    target: gh-pages
    path: subdirectory-to-use
  env:
    GITHUB_TOKEN: ${{ secrets.GITHUB_TOKEN }}
By default, quarto publish will re-render your project before publishing it. However, if you store the rendered output in version control, you don’t need the GitHub action to re-render the project. In that case, add the option render: false to the publish action:
- name: Render and Publish
  uses: quarto-dev/quarto-actions/publish@v2
  with:
    target: gh-pages
    render: false
  env:
    GITHUB_TOKEN: ${{ secrets.GITHUB_TOKEN }}
See the full definition of the Quarto publish action to learn about other more advanced options.
Custom Domain
A custom domain allows you to use your own domain name instead of the default username.github.io domain for your GitHub Pages site. To use a custom domain you need to complete two steps:
- Add your domain to your GitHub repository settings
- Configure records with your DNS provider
1. Add your domain to your GitHub repository settings
Add a CNAME file to your project root directory (i.e., alongside _quarto.yml) that contains your custom domain:
website/
├── _site/
├── _quarto.yml
├── CNAME
├── about.qmd
└── index.qmd
CNAME
blog.example.comQuarto will recognize the CNAME file as a site resource and will copy it your site output directory when you render.
Re-render and publish your site to ensure CNAME is available to GitHub Pages.
The GitHub Pages documentation describes adding your domain to your repository in the Settings pane. However, this creates a CNAME file in the location of your rendered site, which will be overwritten whenever you render your site with Quarto.
2. Configure records with your DNS provider
The records you need to configure with your DNS provider depend on whether you are using an apex domain (e.g., example.com) or a subdomain (e.g., www.example.com or blog.example.com).
Apex domains require an ALIAS, ANAME, or A record, whereas subdomains require a CNAME record. Find the appropriate values from the DNS records summary table in the GitHub Pages documentation. For apex domains, pay particular attention to the DNS record values, you may need to overwrite addresses your DNS provider has added by default.
User Site
In addition to creating sites tied to various repositories, you can also create a user site that is served from your root user domain (e.g. https://username.github.io). This is an ideal place to publish a blog or personal home page. To create a user site:
Create a Git repo with the name
username.github.io(where “username” is your GitHub username) and sync it to your local machine.Set the Source branch for your user site to
gh-pagesas described in Source Branch.