PDF Basics
Overview
Use the pdf format to create PDF output. For example:
---
title: "My document"
format:
  pdf:
    toc: true
    number-sections: true
    colorlinks: true
---
This example highlights a few of the options available for PDF output. This article covers these and other options in detail. See the PDF format reference for a complete list of all available options.
If you want to produce raw LaTeX output (a .tex file) rather than a PDF, all of the options documented here are still available (see the LaTeX Output section below for additional details).
Note that while we will focus here exclusively on the use of LaTeX to create PDFs, Pandoc also has support for creating PDFs using ConTeXt, roff ms, or HTML (via wkhtmltopdf). See the Pandoc documentation on Creating a PDF for additional details.
Prerequisites
In order to create PDFs you will need to install a recent distribution of TeX. We recommend the use of TinyTeX (which is based on TexLive), which you can install with the following command:
Terminal
quarto install tinytexSee the article on PDF Engines for details on using other TeX distributions and PDF compilation engines.
Document Class
Quarto uses KOMA Script document classes by default for PDF documents and books. KOMA-Script classes are drop-in replacements for the standard classes with an emphasis on typography and versatility.
For PDF documents this results in the following Pandoc options set by default:
format:
  pdf:
    documentclass: scrartcl
    papersize: letter
You can set documentclass to the standard article, report or book classes, to the KOMA Script equivalents scrartcl, scrreprt, and scrbook respectively, or to any other class made available by LaTeX packages you have installed.
Setting your documentclass to either book or scrbook will automatically handle many of the common needs for printing and binding PDFs into a physical book (i.e., chapters start on odd pages, alternating margin sizes, etc).
See the Output Options section below for additional details on customizing LaTeX document options.
Table of Contents
Use the toc option to include an automatically generated table of contents in the output document. Use the toc-depth option to specify the number of section levels to include in the table of contents. The default is 3 (which means that level-1, 2, and 3 headings will be listed in the contents). For example:
toc: true
toc-depth: 2
You can customize the title used for the table of contents using the toc-title option:
toc-title: ContentsIf you want to exclude a heading from the table of contents, add both the .unnumbered and .unlisted classes to it:
### More Options {.unnumbered .unlisted}Section Numbering
Use the number-sections option to number section headings in the output document. For example:
number-sections: trueUse the number-depth option to specify the deepest level of heading to add numbers to (by default all headings are numbered). For example:
number-depth: 3To exclude an individual heading from numbering, add the .unnumbered class to it:
### More Options {.unnumbered}Syntax Highlighting
Pandoc will automatically highlight syntax in fenced code blocks that are marked with a language name. For example:
```python
1 + 1
```
Pandoc can provide syntax highlighting for over 140 different languages (see the output of quarto pandoc --list-highlight-languages for a list of all of them). If you want to provide the appearance of a highlighted code block for a language not supported, just use default as the language name.
You can specify the code highlighting style using syntax-highlighting and specifying one of the supported themes. Supported themes include: a11y, arrow, pygments, tango, espresso, zenburn, kate, monochrome, breezedark, haddock, atom-one, ayu, breeze, dracula, github, gruvbox, monokai, nord, oblivion, printing, radical, solarized, and vim.
For example:
syntax-highlighting: githubIn addition to theme names, syntax-highlighting accepts two special values:
none— disables syntax highlighting entirely.idiomatic— delegates highlighting to the output format’s native system instead of Pandoc’s built-in Skylighting engine.
For LaTeX/PDF output, syntax-highlighting: idiomatic uses the LaTeX listings package for code highlighting instead of Pandoc’s default approach (which uses fancyvrb with \Shaded/\Highlighting environments). This may be preferred when working with LaTeX templates or publishers that expect listings-based code blocks.
Highlighting themes can provide either a single highlighting definition or two definitions, one optimized for a light colored background and another optimized for a dark color background. When available, Quarto will automatically select the appropriate style based upon the code chunk background color’s darkness. You may always opt to specify the full name (e.g. atom-one-dark) to bypass this automatic behavior.
By default, code is highlighted using the arrow theme, which is optimized for accessibility. Here are examples of the arrow light and dark themes:
![]()
![]()
Code Annotation
You can add annotations to lines of code in code blocks and executable code cells. See Code Annotation for full details.
Output Options
There are numerous options available for customizing PDF output, including:
Specifying document classes and their options
Including lists of figures and tables
Using the
geometryandhyperrefpackagesNumerous options for customizing fonts and colors.
For example, here we use a few of these options:
---
title: "My Document"
format:
  pdf:
    documentclass: report
    classoption: [twocolumn, landscape]
    lof: true
    lot: true
    geometry:
      - top=30mm
      - left=20mm
      - heightrounded
    mainfont: Times New Roman
    colorlinks: true
---
See the Pandoc documentation on metadata variables for LaTeX for documentation on all available options.
PDF Accessibility & Standards
Create PDFs that work with screen readers and meet archival requirements using the pdf-standard option. This enables PDF/UA for accessibility, PDF/A for long-term archival, or explicit PDF version control.
Basic Example
For an accessible PDF that works with screen readers:
---
title: "Accessible Report"
format:
  pdf:
    pdf-standard: ua-2
---
Supported Standards
You can specify one or more standards. Quarto checks that the standards are supported by your output format and infers a compatible PDF version (some standards have maximum version requirements).
| Standard | Description |
|---|---|
ua-2 |
PDF/UA-2 for screen reader accessibility |
a-1b |
PDF/A-1 for long-term archival |
a-2a, a-2b, a-2u |
PDF/A-2 archival with newer features |
a-3a, a-3b, a-3u |
PDF/A-3 archival allowing embedded files |
a-4, a-4f |
PDF/A-4 (based on PDF 2.0) |
x-4, x-4p, x-5g, x-5n, x-5pg, x-6, x-6n, x-6p |
PDF/X for print production |
1.4, 1.5, 1.6, 1.7, 2.0 |
Explicit PDF version |
When specifying only a PDF version like 1.7 or 2.0, use quotes so YAML treats it as a string: pdf-standard: "1.7".
Combining Standards
It’s common to combine PDF/A (archival) with PDF/UA (accessibility) for documents that need both long-term preservation and screen reader support:
format:
  pdf:
    pdf-standard: [a-4f, ua-2]
You can only specify one standard from each family (one PDF/A variant, one PDF/UA variant, etc.).
Accessibility Requirements
Although Quarto can’t on its own guarantee accessibility requirements are met, many are satisfied through the Markdown structure of the document:
- Document metadata: YAML fields like
title,author,date, andlangare propagated into the PDF document metadata, fulfilling metadata requirements for accessibility and archival standards.
- Document tagging: Markdown provides the semantic structure to fulfill tagging requirements. Pandoc enables PDF tagging for LaTeX when you specify a standard that requires it (PDF/UA standards and PDF/A “a” variants like
a-2a).
- Alt text propagation: Alt text from
fig-altattributes is passed through to the PDF for screen readers. See Figures for details on specifying alt text.
Use validation (described below) to identify accessibility issues in your documents that may require manual attention.
Validation with veraPDF
When pdf-standard is set, Quarto can validate your output against PDF/A and PDF/UA specifications using veraPDF. Install it with:
Terminal
quarto install verapdfveraPDF requires a stable version of Java: 8, 11, 17, or 21.
Alternatively, set the QUARTO_VERAPDF environment variable to your veraPDF command or path, or have veraPDF available in your .
Once installed, validation runs automatically after rendering. Any compliance issues appear as warnings in your render output, helping you identify accessibility or archival problems in your documents.
Fonts
Using lualatex, the default engine, or the xelatex engine, you can specify fonts with the YAML options:
| Option | Document Element |
|---|---|
sansfont |
Headings |
mainfont |
Main body text |
monofont |
Code |
mathfont |
Math |
CJKmainfont |
The CJK main font family |
Values for these options should be the family name of system installed fonts. For example:
---
format:
  pdf:
    mainfont: "Times New Roman"
---
Fonts are set using the fontspec package. You can set additional font features using the corresponding <fontoption>options key. For example, you could set headings to the color #39729E:
---
format:
  pdf:
    sansfont: "Open Sans"
    sansfontoptions:
      - Color=39729E
---
pdflatex
If you use the pdflatex engine, use the fontfamily option to specify a font from the The LaTeX Font Catalogue. For example:
---
title: pdflatex fonts
format:
  pdf:
    pdf-engine: pdflatex
    fontfamily: anttor
---
Unicode Characters
By default, Quarto uses the lualatex engine to produce PDFs from LaTeX. lualatex has native support for unicode characters, but it is possible some customization will be required in order to properly typeset specific unicode characters. In particular, it is important that you use a font that supports the characters that you are using in your document. To identify fonts on your system that support specific language characters, you can use the following command:
Terminal
fc-list :lang=<lang> familyWhere <lang> is a ISO 639 language code. For example, to see a list of fonts that support Japanese characters, use:
Terminal
fc-list :lang=ja familySelect a font name from the list and use that as the document’s main font:
---
title: Unicode test
format: pdf
mainfont: "Hiragino Sans GB"
---

## Test Document

青黑體簡體中文,ヒラギノ角
Another common example of Unicode characters are documents that include Greek symbols:
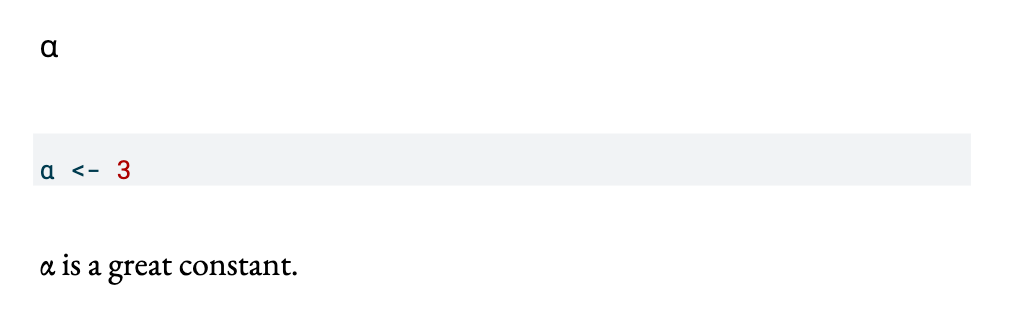
greek.qmd
---
format: pdf
---

## α

```r
α <- 3
```

α is a great constant.
```
Follow the same process as above to discover fonts that support Greek:
Terminal
fc-list :lang=el familyThen set the appropriate font options:
greek.qmd
---
format:
  pdf:
    mainfont: "EB Garamond"
    sansfont: "Open Sans"
    monofont: "Roboto Mono"
---
(These particular fonts are available from Google Fonts.)
With fonts with appropriate support, Greek symbols render correctly in headings, the main text and code cells:
SVG Images
Using rsvg-convert to convert to PDF
Quarto supports rendering of PDF documents that include SVG files, automatically converting them to PDF images if rsvg-convert is available on the system path during rendering.
You can learn more about installing librsvg (which provides rsvg-convert), see https://wiki.gnome.org/Projects/LibRsvg. To install on specific platforms:
On MacOS, use Homebrew:
brew install librsvgOn Linux, tarballs available at: https://download.gnome.org/sources/librsvg/
On Windows, install using chocolatey:
choco install rsvg-convertor using Scoop:# scoop bucket add r-bucket https://github.com/cderv/r-bucket.git scoop install rsvg-convert
Alternative: Using Inkscape
If you prefer to use Inkscape instead of rsvg-convert, you can disable the default conversion by setting use-rsvg-convert: false. This will use the SVG LaTeX package to include the svg using \includesvg{} which uses Inkscape to convert to PDF. This requires some configuration to opt-in:
format:
  pdf:
    use-rsvg-convert: false
    pdf-engine-opts: ["-shell-escape"]
Note that this configuration requires:
- Inkscape to be installed and available on your system PATH
- The
-shell-escapeoption for your LaTeX engine to allow execution of external programs - The SVG LaTeX package (automatically included by Quarto)
Platform Considerations
The availability and ease of installation for SVG conversion tools varies by platform:
- Linux/macOS:
rsvg-convertis typically available through package managers (librsvgpackage). This is the recommended approach for these platforms. - Windows: Installing
rsvg-convertis more challenging. While it can be installed via Scoop (as shown above), most Windows users should consider using PNG format for diagrams rather than SVG. - Inkscape: Available cross-platform but requires the
-shell-escapeconfiguration. Consider using this only when you specifically need Inkscape’s rendering capabilities.
For diagram formats, PNG is generally recommended for best compatibility and ease of use. See the Note 1 below for more details.
When using Mermaid or Graphviz diagrams in PDF documents, the default PNG format is recommended. While SVG output is possible with mermaid-format: svg, it requires external tooling:
rsvg-convert(default) - See installation instructions above- Inkscape (alternative) - Requires
use-rsvg-convert: falseand-shell-escapeconfiguration
SVG format may also have rendering issues such as text clipping in diagrams with multi-line labels. For most users, PNG format provides better compatibility and ease of use. See Diagrams for more information.
Remote Images
You can reference remote images directly using URLs:
Images are automatically downloaded during rendering and embedded in the PDF.
Citations
When creating PDFs, you can choose to use either the default Pandoc citation handling based on citeproc, or alternatively use natbib or BibLaTeX. This can be controlled using the cite-method option. For example:
format:
  pdf:
    cite-method: biblatex
The default is to use citeproc (Pandoc’s built in citation processor).
See the main article on using Citations with Quarto for additional details on citation syntax, available bibliography formats, etc.
Options
When using natbib or biblatex you can specify the following additional options to affect how bibliographies are rendered:
| Option | Description |
|---|---|
| biblatexoptions | List of options for biblatex |
| natbiboptions | List of options for natbib |
| biblio-title | Title for bibliography |
| biblio-style | Style for bibliography |
Raw LaTeX
When creating a PDF document, Pandoc allows the use of raw LaTeX directives intermixed with markdown. Although Pandoc allows LaTeX to appear unescaped in Markdown, we instead recommend to wrap the content in a raw block. For example:
```{=latex}
\begin{tabular}{|l|l|}\hline
Age & Frequency \\ \hline
18--25  & 15 \\
26--35  & 33 \\
36--45  & 22 \\ \hline
\end{tabular}
```
Raw LaTeX can be specified as a block element (as shown above), or as an inline element, such as `\textrm{hello}`{=latex}. Raw LaTeX commands will be preserved and passed unchanged to the LaTeX writer.
While it’s very convenient to use raw LaTeX, raw LaTeX is ignored when rendering to other formats like HTML and MS Word. If you plan on rendering to other formats then the example above would be better written using native markdown tables.
In some cases raw LaTeX will require additional LaTeX packages. The LaTeX Includes section below describes how to include \usepackage commands for these packages in your document.
LaTeX Includes
If you want to include additional content in your document from another file, you can use the include-in-* options:
| Option | Description |
|---|---|
include-in-header |
Include contents of file, verbatim, at the end of the header. This can be used, for example, to include special CSS or JavaScript in HTML documents or to inject commands into the LaTeX preamble. |
include-before-body |
Include contents of file, verbatim, at the beginning of the document body (e.g. after the <body> tag in HTML, or the \begin{document} command in LaTeX). This can be used to include navigation bars or banners in HTML documents. |
include-after-body |
Include contents of file, verbatim, at the end of the document body (before the </body> tag in HTML, or the \end{document} command in LaTeX). |
You can specify a single file or multiple files for each of these options directly, or use the file: subkey. To include raw content in the YAML header, use the text subkey. When using text:, add the | character after text: to indicate that the value is a multi-line string. If you omit file: or text:, Quarto assumes you are providing a file.
For example:
format:
  pdf:
    include-in-header:
      - text: |
          \usepackage{eplain}
          \usepackage{easy-todo}
      - file: packages.tex
      - macros.tex
Any packages specified using includes that you don’t already have installed locally will be installed by Quarto during the rendering of the document.
LaTeX Output
If you want Quarto to produce a LaTeX file (.tex) rather than a PDF (for example, if you want to do your own processing of the PDF) there are two ways to accomplish this:
Use the
latexformat rather than thepdfformat. For example:format: latex: documentclass: report classoption: [twocolumn, landscape] lof: true lot: trueNote that all of the PDF format options documented above will also work for the
latexformat.Use the
pdfformat along with thekeep-texoption. For example:format: pdf: documentclass: report keep-tex: trueThis technique will produce a PDF file for preview, but will also create a
.texfile alongside it that you can do subsequent processing on.
Both techniques will also produce all LaTeX temporary files, including .bbl files and so on, that might be required by a publisher that wants LaTeX sources.