Quarto includes a number of features aimed at making it easy to to author and customize markdown table output, including:
Specifying column alignment and widths.
Providing captions, subcaptions, and cross-references.
Generating tables dynamically from executable code cells.
This article covers using these features in-depth.
Markdown Tables
The most commonly used markdown table is known as a pipe table. Pipe tables support specifying per column alignment as well as captions. For example:
| Default | Left | Right | Center ||---------|:-----|------:|:------:|| 12 | 12 | 12 | 12 || 123 | 123 | 123 | 123 || 1 | 1 | 1 | 1 |: Demonstration of pipe table syntax
Demonstration of pipe table syntax
Default
Left
Right
Center
12
12
12
12
123
123
123
123
1
1
1
1
The beginning and ending pipe characters are optional, but pipes are required between all columns. The colons indicate column alignment as shown. The header cannot be omitted, however you can simulate a headerless table by including a header with blank cells.
Since the pipes indicate column boundaries, columns need not be vertically aligned, as they are in the above example. So, this is a perfectly legal (though ugly) pipe table:
The cells of pipe tables cannot contain block elements like paragraphs and lists, and cannot span multiple lines. If a pipe table contains a row whose markdown content is wider than the column width (see columns option), then the table will take up the full text width and the cell contents will wrap, with the relative cell widths determined by the number of dashes in the line separating the table header from the table body.
For example ---|- would make the first column 3/4 and the second column 1/4 of the full text width. On the other hand, if no lines are wider than column width, then cell contents will not be wrapped, and the cells will be sized to their contents.
Using Bootstrap classes
Bootstrap table classes given as attributes next to a table caption are inserted into the <table> element. The classes permitted are those that apply expressly to the entire table, and these are: "primary", "secondary", "success", "danger", "warning", "info", "light", "dark", "striped", "hover", "active", "bordered", "borderless", "sm", "responsive", "responsive-sm", "responsive-md", "responsive-lg", "responsive-xl", "responsive-xxl". For example, the following Markdown table will be rendered with row stripes and the rows will also be highlighted on hover:
| fruit | price ||--------|--------|| apple | 2.05 || pear | 1.37 || orange | 3.09 |: Fruit prices {.striped .hover}
Fruit prices
fruit
price
apple
2.05
pear
1.37
orange
3.09
Authoring
For simple tables with only a few cells it’s straightforward to create them directly in markdown. As tables get larger, it makes sense to use an authoring tool. Some table authoring tools to consider include:
Visual editor for .qmd files with table editing support.
Column Widths
Above we describe a means of specifying column widths using the relative number of dashes in each column header (e.g., ---|- to get a 75% / 25% split for a two-column table).
You can also explicitly specify columns widths using the tbl-colwidths attribute or document-level option. For an individual markdown table, add the attribute after the caption. For example:
| fruit | price ||--------|--------|| apple | 2.05 || pear | 1.37 || orange | 3.09 |: Fruit prices {tbl-colwidths="[75,25]"}
Fruit prices
fruit
price
apple
2.05
pear
1.37
orange
3.09
If your table doesn’t have a caption, then you can still specify only tbl-colwidths:
| fruit | price ||--------|--------|| apple | 2.05 || pear | 1.37 || orange | 3.09 |: {tbl-colwidths="[75,25]"}
fruit
price
apple
2.05
pear
1.37
orange
3.09
Column widths can also be specified at the document level (e.g., to have uniform widths across a set of tables):
You may want to create a composition of several sub-tables. To do this, create a div with a main identifier, then apply sub-identifiers (and optional caption text) to the contained tables. For example:
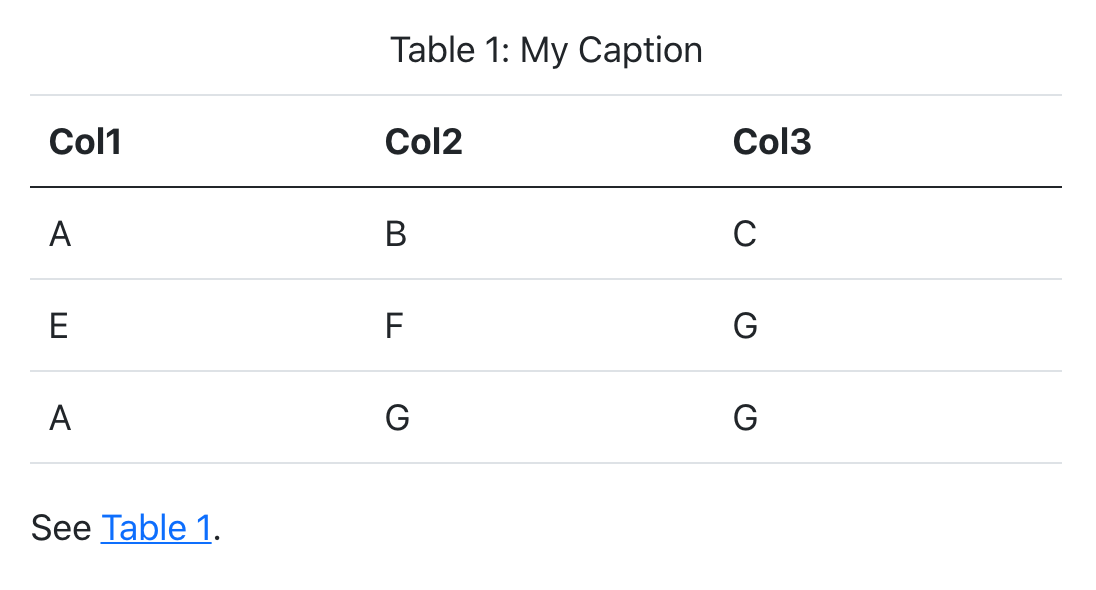
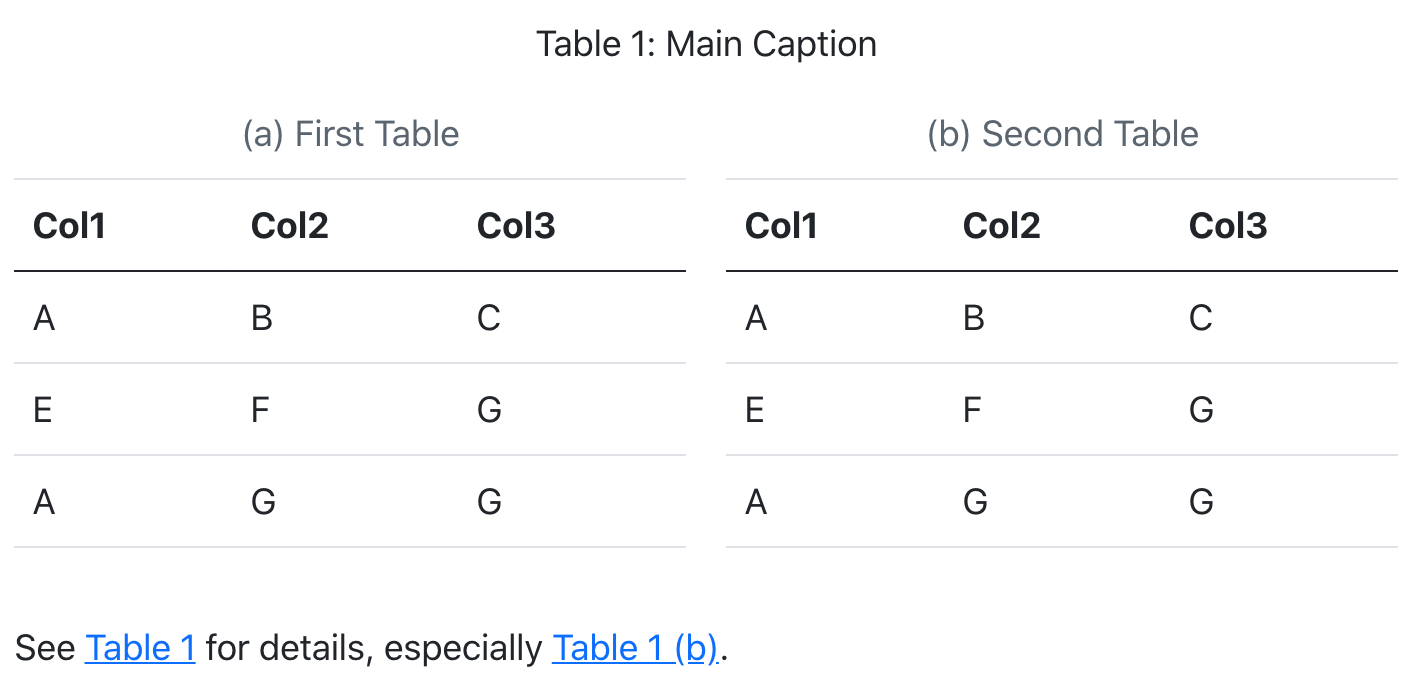
::: {#tbl-panel layout-ncol=2}| Col1 | Col2 | Col3 ||------|------|------|| A | B | C || E | F | G || A | G | G |: First Table {#tbl-first}| Col1 | Col2 | Col3 ||------|------|------|| A | B | C || E | F | G || A | G | G |: Second Table {#tbl-second}Main Caption:::See @tbl-panel for details, especially @tbl-second.
Which looks like this when rendered to HTML:
Note that the “Main Caption” for the table is provided as the last block within the containing div.
Caption Location
By default, table captions are positioned above tables. You can modify this behavior using the tbl-cap-location option. For example:
---tbl-cap-location: top---
Note that this option is specified at the top level so that it can be shared by both PDF and HTML formats. If you are only targeting a single format you can place it alongside other format specific options.
Valid values for the caption location include:
Value
Description
top
Position the caption above the table.
bottom
Position the caption below the table.
margin
Position the caption in the margin.
See the article on Article Layout for additional details on placing captions in the margin.
Computations
All of the options described above work for tables produced by executable code cells. For example, here we use the Python tabulate package along with the Markdown() function from the IPython display module to print a markdown table:
Note that we use the display() function imported from IPython so that we can render multiple outputs from a single cell (by default cells only output their last expression).
Quarto adds additional styling to tables generated by computations. By default, such tables are styled to be smaller and have striped rows. If you want to disable this treatment, add plain to the classes of the code cell:
List tables provide an alternative syntax for creating tables with complex content like multiple paragraphs, code blocks, or lists. Unlike grid tables, list tables use familiar bullet list syntax, making them easier to write and maintain.
A list table is a fenced div with the .list-table class containing a bullet list. Each top-level bullet represents a row, and nested bullets represent cells:
::: {.list-table}- - Fruit - Price- - Apple - 1.20- - Orange - 0.90:::
Fruit
Price
Apple
1.20
Orange
0.90
List tables support block elements within cells, including code blocks and lists:
::: {.list-table}- - Function - Description- - `sum()` - Add values:```pythonsum([1, 2, 3])```- - `len()` - Count items: - Works on lists - Works on strings:::
Function
Description
sum()
Add values:
sum([1, 2, 3])
len()
Count items:
Works on lists
Works on strings
Be careful to maintain the usual whitespace requirements: indent nested items and include blank lines around code blocks.
Header Rows
By default, the first row is treated as a header. To change this, set the header-rows attribute to 0:
To add attributes to a cell, start the cell with an empty span containing the attributes. For example, use rowspan and colspan to span cells across rows or columns:
The empty span must be the first inline element in the cell. Cells with rowspan or colspan still count toward the total number of cells in a row—subsequent rows should have fewer cells to account for the span.
Grid Tables
Grid tables are a more advanced type of markdown tables that allow arbitrary block elements (multiple paragraphs, code blocks, lists, etc.). For example:
The row of =s separates the header from the table body, and can be omitted for a headerless table. The cells of grid tables may contain arbitrary block elements (multiple paragraphs, code blocks, lists, etc.)
Alignments can be specified as with pipe tables, by putting colons at the boundaries of the separator line after the header:
+---------+--------+------------------+| Right | Left | Centered |+========:+:=======+:================:+| Bananas | $1.34 | built-in wrapper |+---------+--------+------------------+
Which looks like this when rendered to HTML:
Right
Left
Centered
Bananas
$1.34
built-in wrapper
For headerless tables, the colons go on the top line instead:
+----------:+:----------+:--------:+| Right | Left | Centered |+-----------+-----------+----------+
Which looks like this when rendered to HTML:
Right
Left
Centered
Note that grid tables are quite awkward to write with a plain text editor (because unlike pipe tables, the column indicators must align). Here are some tools that can assist with creating grid tables:
Tables Generator’s Plain Text mode with Use reStructuredText syntax enabled
HTML Tables
Quarto can process HTML tables in htmlRawBlock nodes (i.e., {=html}) and convert them to Markdown tables, regardless of the output format (intentionally including non-HTML formats). As a result, you can use HTML table syntax in your documents and it will be converted to Markdown syntax for all formats. Additionally, libraries that emit computational tables in HTML format can work in other output formats.
For example, consider the following raw HTML block:
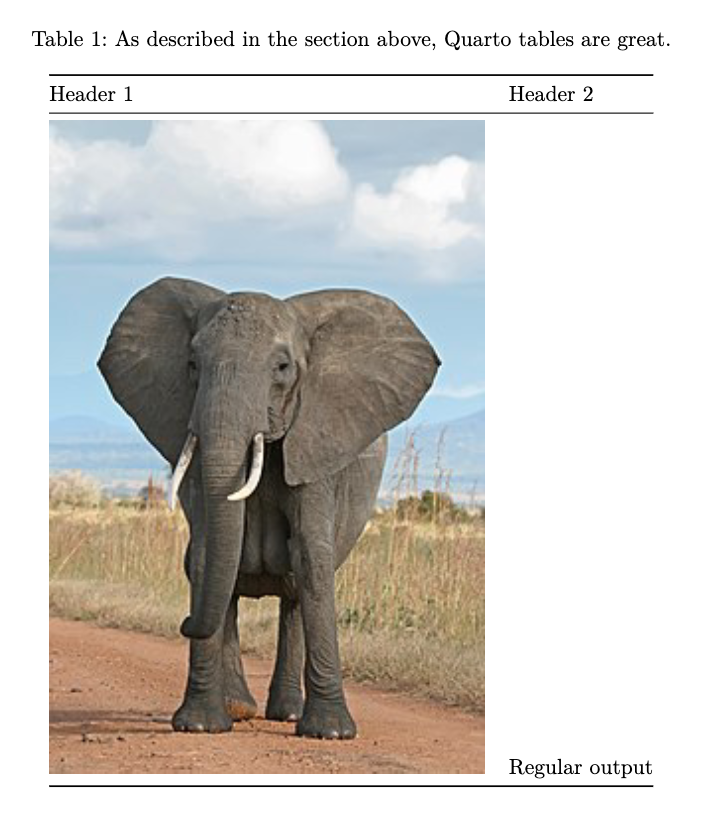
```{=html}<table> <caption>As described in the section above, Quarto tables are great.</caption> <thead> <tr> <th>Header 1</th> <th>Header 2</th> </tr> </thead> <tbody> <tr> <td><img src="https://upload.wikimedia.org/wikipedia/commons/thumb/3/37/African_Bush_Elephant.jpg/220px-African_Bush_Elephant.jpg" alt="African Bush Elephant" /></td> <td>Regular output</td> </tr> </tbody></table>```
When rendered, this results in the following output for HTML and PDF formats:
HTML Output
As described in the section above, Quarto tables are great.
Header 1
Header 2
Regular output
PDF Output
In addition, Quarto supports the specification of embedded Markdown content in raw table markup. This allows Quarto features like cross-references, shortcodes, and markdown formatting to be used inside tables produced by libraries that emit raw HTML or LaTeX.
HTML Raw Blocks
For HTML raw blocks, this is done by providing a data attribute qmd or qmd-base64 in an embedded span or div node. These nodes can appear anywhere that such content is allowed: table headers, footers, cells, captions, etc.
For example, the following table includes a cross reference, markdown formatting and a shortcode:
## HTML Tables Example {#sec-html-tables}```{=html}<table> <caption><span data-qmd="As described in [Section -@sec-html-tables], Quarto are great."></span></caption> <thead> <tr> <th><span data-qmd="_Header 1_"></span></th> <th><span data-qmd="_Header 2_"></span></th> </tr> </thead> <tbody> <tr> <td><span data-qmd="{{< video https://www.youtube.com/embed/wo9vZccmqwc >}}"></span></td> <td>Regular output</td> </tr> </tbody></table>```
For LaTeX raw blocks (used in PDF output), the equivalent syntax is \QuartoMarkdownBase64{<<base64-encoded-content>>}. When Quarto detects this command, it decodes the base64 content, processes it as Quarto markdown (including cross-references, shortcodes, and user filters), and inserts the result back into the LaTeX output.
For example, the following LaTeX raw block uses cross-references and markdown formatting inside a table:
## LaTeX Tables Example {#sec-latex-tables}```{=latex}\begin{tabular}{ll} % X0hlYWRlciAxXw== is base64 for "_Header 1_" \QuartoMarkdownBase64{X0hlYWRlciAxXw==} & % X0hlYWRlciAyXw== is base64 for "_Header 2_" \QuartoMarkdownBase64{X0hlYWRlciAyXw==} \\ % U2VlIEBzZWMtbGF0ZXgtdGFibGVzLg== is base64 for % "See @sec-latex-tables." \QuartoMarkdownBase64{U2VlIEBzZWMtbGF0ZXgtdGFibGVzLg==} & Regular output \\\end{tabular}```
When rendered to PDF, this table would display with italic headers (Header 1 and Header 2), and the cross-reference @sec-latex-tables would be resolved to a clickable section link.
Note
Unlike the HTML feature, only base64-encoded content is supported for LaTeX raw blocks (there is no plain-text equivalent of data-qmd). This feature cannot be disabled, but this should not be necessary since \QuartoMarkdownBase64 is unlikely to conflict with existing LaTeX commands.
Warning
Citations do not currently work inside \QuartoMarkdownBase64. See GitHub issue #9342 for details.
Colspans and Rowspans
Tables containing cells spanning multiple rows or columns are supported across output formats.
except in PDF margins
However, using markdown, it is tricky to draw grid tables with spans, and there is no way to express spans in pipe tables.
If you are comfortable with HTML, or use a package that generates HTML, the table cell HTML attributes colspan and rowspan are a better option.
I span two columns
C1
I span two rows
B2
C2
B3
C3
```{=html}<table><tr><td colspan="2">I span two columns</td><td>C1</td></tr><tr><td rowspan="2">I span two rows</td><td>B2</td><td>C2</td></tr><tr><td>B3</td><td>C3</td></tr></table>```
Individual cell alignment
Markdown supports specification of alignment by column, but does not allow setting the alignment of individual cells. The CSS properties text-align and vertical-align are only available through Raw HTML. (These are not currently supported by PDF/Latex or Pptx output formats, and Docx only supports text-align.)
It’s possible that Quarto’s processing of HTML tables may interfere with the HTML produced computationally with table packages in R and Python (or other supported languages).
When you disable Quarto’s HTML table processing, tables are not translated to Markdown, will not be rendered to other output formats, and can not use Quarto Markdown features, like cross-references, shortcodes, etc. The tables also won’t be visible to Lua filters that act on Table nodes.
You can disable Quarto’s HTML table processing at a document level or project level with the option html-table-processing:
---format:html:html-table-processing: none---
This option is also available as a code cell option for Knitr and Jupyter, e.g.
```{r}#| html-table-processing: none# R Code that generates an HTML table```
To disable Quarto’s HTML table processing for parts of a document use a div with the attribute html-table-processing="none":
::: {html-table-processing="none"}Content with HTML tables you don't want processed.:::
Library authors
If you are the author of a library that emits HTML tables you might like to disable Quarto’s processing of HTML tables by adding the attribute data-quarto-disable-processing="true" to the <table> element. For example: